

Transform Broken Mirror Pieces into Stunning Wall Mosaic Art
Introduction to Mirror Mosaic Art
Creating mosaic art from broken mirror pieces is an innovative and eco-friendly way to turn something seemingly useless into a captivating decorative feature. Whether you are an experienced artist or a DIY enthusiast, repurposing mirror shards allows for endless creativity while contributing to sustainable practices. This craft not only enhances aesthetic appeal but also adds a reflective quality that can brighten and enlarge a space visually.
Statistics show that upcycling and DIY home decor projects have surged in popularity, with a 35% increase in participation over the last five years. This trend is driven by a desire for unique personalization and environmental consciousness. Using broken mirrors as mosaic tiles offers an affordable alternative to purchasing new decorative materials, transforming household waste into art.
Gathering and Preparing Your Mirror Pieces
Collecting Broken Mirrors
Before starting your mosaic project, gather broken mirror shards. Ensure the pieces are safe to handle—wear thick gloves and eye protection. Use a dust mask if fragments are very fine or dusty. You can find broken mirrors in old frames, discarded furniture, or from household breakages. Always inspect the shards for sharp edges and smooth out rough points with an abrasive stone or file.
Cleaning and Sorting
Wash the mirror pieces thoroughly with soap and water to remove dust, dirt, and any adhesive residues. Dry each piece completely to prevent slipping during application. Sort the shards by size, shape, or color if desired—this helps in planning your design. For a more uniform look, you might focus on similar sizes, but for a more eclectic mosaic, mix different shapes freely.
Designing Your Mosaic Pattern
Planning your mosaic pattern is crucial. You can opt for a geometric, abstract, or representational design. Sketch your idea on paper first, mapping out where each piece will go. Use grid paper or a digital design tool to experiment with arrangements. Remember, with broken mirror shards, irregular shapes can add a striking, organic look, while tessellating uniform pieces creates a more structured pattern.
Ideas for Artistic Inspiration
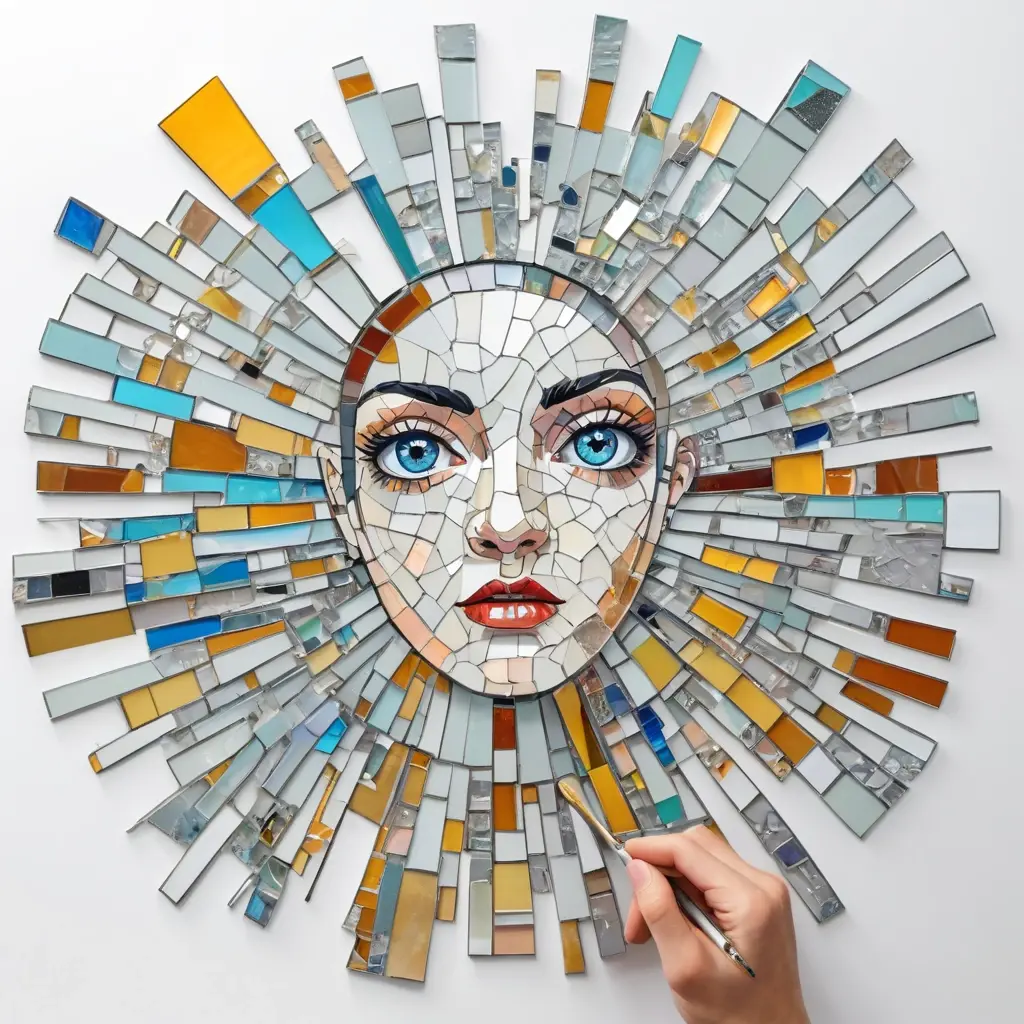
- Sunburst or radiating designs around a central point
- Mirror mosaic animals or nature motifs
- Geometric patterns with contrasting colors or textures
- Abstract art with chaotic, multicolored shards
Preparing the Surface and Adhesive
Choose a sturdy backing surface—wood, cement, or plaster—depending on where you plan to display your mosaic. Ensure the surface is clean, dry, and smooth. Use painter’s tape to create boundaries or outlines if you want crisp edges in your design.
For adhesion, select a high-quality, clear-drying mosaic adhesive or thinset mortar suitable for mirrors and tiles. Apply patches of adhesive to the back of each shard using a trowel or spatula, pressing firmly into the surface. Use spacers if you prefer uniform gaps or grout lines; otherwise, aim for a seamless look by pressing the shards directly together.
Attaching and Arranging the Mirror Pieces
Begin attaching the shards from the center outward or vice versa, depending on your design. Press each piece into the adhesive, making sure it is securely bonded. Adjust as necessary before the adhesive dries. For most adhesives, plan to wait 24 hours for a complete set. During this time, keep the surface undisturbed.
Finishing Touches: Grouting and Sealing
Applying Grout
If you prefer a traditional mosaic appearance, apply grout between the shards after the adhesive sets. Use a rubber float to spread the grout over the entire surface, pressing it into gaps. Wipe excess grout with a damp sponge, and allow it to cure as per product instructions. Grouting enhances the stability of the mosaic and can add color depth.
Sealing the Surface
To protect your artwork from dust and moisture, apply a clear sealant suitable for mirrors and ceramics. Sealant also enhances the reflectivity of the surface, giving your mosaic a polished look. Use a spray or brush-on sealant, following manufacturer recommendations, and let it dry completely before hanging or displaying.
Displaying Your Mirror Mosaic Art
Choose an appropriate spot to showcase your work—living rooms, entryways, bathrooms, or even as a decorative partition. Use sturdy hooks or frames to hang your mosaic securely. The reflective quality will add light and visual interest to any space, making it a conversation starter and a unique personal statement.
Author’s Advice and Tips
“Always test your pattern on paper or a smaller surface first. This minimizes mistakes and helps you visualize the final piece. Remember, the beauty of mosaic art lies in its imperfections—embrace the irregular shapes and eclectic colors for genuine character.”
Benefits of Turning Broken Mirror Pieces into Art
- Eco-Friendly: Recycles waste, reducing landfill and environmental impact.
- Cost-Effective: Uses readily available materials—your broken mirrors.
- Customizable: Unique designs tailored to your taste or space.
- Reflective and Light-Enhancing: Adds brightness and depth to your interiors.
Conclusion
Transforming broken mirror shards into mosaic art is a rewarding process that combines creativity, sustainability, and craftsmanship. By following proper safety precautions, planning your design, and choosing the right materials, you can craft a stunning wall feature that reflects your personality and artistic flair. Not only do you give new life to discarded materials, but you also create a one-of-a-kind piece that captivates and brightens your environment. So gather your shards, unleash your imagination, and turn fractured glass into a shimmering masterpiece.
Remember
The beauty of mosaic art is in its imperfections and the personal story it tells—embrace the irregularities, and let your creativity shine through every piece.
1. Q: Is it safe to use broken mirror pieces for mosaic art?
A: Yes, as long as you handle the shards carefully with gloves and eye protection. Smooth out rough edges and dispose of very small or sharp pieces responsibly.
2. Q: What adhesive is best for attaching mirror shards to a wall?
A: Opt for a high-quality, clear-drying mosaic adhesive or thinset mortar suitable for mirrors and tiles to ensure a durable bond.
3. Q: Can I seal my mirror mosaic to enhance durability?
A: Absolutely. Applying a clear sealant protects your artwork from dust and moisture and can improve its reflective quality.
4. Q: What design patterns work best with mirror mosaic art?
A: You can choose geometric, abstract, or nature-inspired patterns. Planning your design beforehand helps achieve a balanced and attractive final piece.
5. Q: How long does it take for the adhesive and grout to dry?
A: Typically, adhesive requires 24 hours to set, and grout can take 24-48 hours to cure fully, depending on the products used and environmental conditions.